Wednesday, May 13, 2009

Background Information

Originally used as a survival necessity, clothing has evolved dynamically over the years. Our attire acts as silent words, telling passers by of our social status, wealth, opinions, or views. Though it’s not appropriate to judge someone on their opinion, quoting the old adage “you can’t judge a book by its cover,” nearly everyone does.
This is true in any situation, whether it’s casual wear or formal. One particular yearly event, high school prom, reflects this. It is the one time when students get to don beautiful expensive garb and dress to impress. Without fail it is everyone’s goal to look the most beautiful or handsome. This is a wonderful time for designers to showcase their talent. Prom dress prices can range anywhere from clearance racks to more expensive than some wedding gowns. Though this might seem very lucrative, much design must go into each dress. The designer’s aim is to create a beautiful gown that appeals to mass audiences. They must combine their knowledge of the time’s fashion with the availability of materials. It’s necessary to take color, texture, fabric type, size and cut, and length into consideration. This it not exclusively relating to prom gowns as men’s suits also must be carefully designed.
Before a gown can be made, the designer must take into account several things. For starters, they will have to decide on a style. They might choose a classic design or they might go for a more abstract design concept, such as a short dress, an uneven cut, or a dropped waistline. Whatever the case, their aim is to appeal to a broad range of people in order to sell the most dresses. Color of the dress is important as well, and generally it seems that pink is the most abundant color for gowns while other colors fall into obscurity. Fabric choice is generally not so complicated. There are a few common threads used in prom gowns- polyester and silk. Taffeta and organza have their spots in the field as well as tulle for added volume. If the dress is a custom design, specific measurements for the client must be taken for the bust, waist, hip, length, and back. Mass produced gowns follow the standard sizing guide as they will fit the majority of women suitably.
Men’s suits are surprisingly just as complicated. Suits have several different cuts: American, European, Italian, or contemporary. Though they look similar, the fitting is definitely different. Color wise, black is standard, but few are bold enough to venture for other colors-white being the most common uncommon color. The dress shirt worn underneath is generally a standard design, but the colors are numerous. Typically, the shirt matches the color of the gown. This doesn’t mean the exact shade, but if a girl’s dress is pastel, his shirt should be as well. If her dress is red, so should his shirt.
This project entails designing a custom prom gown and suit to be submitted to a TSA competition. Special attention should be paid to the small details-fabric choice, color matching, patterns as well as the reasoning behind it. Judges are looking for a comprehensive understanding of fashion and the mechanics behind it. As the project progresses, illustrations are made to accompany the outfits in submission. Also included is a portfolio.

Design Brief

Design and create a prom dress and matching suit appealing and marketable to a large audience.

Specifications

  • The gown and suit must be started and completed during the school year
  • The portfolio must be 15 pages long and submitted with the outfits
  • Garments must be presentation quality
  • Garments must be appropriate for viewing
  • The gown must follow a theme
  • The suit must match the gown
  • The design of the gown must appeal to a broad audience
  • The design of the suit must appeal to a broad audience
  • The designs must be innovative

Limitations

  • The garment must not be inappropriate or unacceptable
  • The portfolio must be on 11x17 paper or smaller
  • The garments must not be made from premade patterns

Tuesday, May 12, 2009

Testing Results

The testing of the TSA: Fashion Design project is a two-fold process. Testing incorporates not only a school survey, but the TSA Competition as well. In school, not only must the garments be assessed based on their visual appeal, but they must also be tested based on their construction. The models will assess the comfort level and sturdiness of the garments based on a survey. Then the visual appeal will be determined by surveying students in school. Since an actual score cannot be obtained from the TSA judges, the overall placement of participating teams will be the assessment.

Testing Procedure:
At the TSA Competition (Primary Testing):
Materials:
15 quart plastic containers (2)
Gown
Suit Trousers and Jacket
Identification labels
Models and Emcee
15 Page Portfolio:
Title Page (1)
Literature, synthesis, interpretation of theme, garment type and textiles to be used in design report (2)
Design process sketches (6)
Computer printouts for final design (6)
References
1. Contestants show up at assigned room on time and pick up garments
2. Models change into garments
3. Groups have 2 minutes to prepare
4. Emcee introduces garments and describes construction (6 minutes)
5. After presentation, garments are returned to judges
6. Groups show up at awards ceremony to receive awards

Below is a point-scale breakdown of the grading of the TSA Fashion Design competition:
Portfolio (75 points)
Title, literature, synthesis, interpretation of theme, garment type and textiles to be used in design (10 points)
Design process sketches (30 points)
Computer printouts for final designs (30 points)
References (5 points)
On-site presentation (25 points)
Quality of Garments (15 points)
Presentation quality (5 points)
Organization and depiction of theme (5 points)
Rules Violation (-20% total points)

At School (Secondary Testing):
Materials:
Printed Surveys
Gown
Suit jacket and trousers
Models
Sample of Students
1. During the systems period (7/8), models will be excused to change into garments.
2. Models will be asked to try on garments and assess their comfort level as well as sturdiness of construction. In other words, they will not be assessing the actual construction, but rather the garments ability to not rip, fray, etc. Their responses will be recorded on a survey.
3. A sample of students will be asked to assess the visual appeal of the garments. They will be handed out surveys and asked to fill them out.
4. Surveys will be collected and conclusions drawn from the feedback.

Testing Stages:
TSA Competition:
The primary testing for the TSA: Fashion Design project entailed the participation in the TSA competition. The garments and portfolio were submitted to the area managers two weeks prior to the competition. This allowed the judges to look over the portfolio ahead of time and judge it before the competition.
As per TSA regulations, all competitors from MAST arrived at 7:00 at High Tech High School donning the standard TSA garb: a blue blazer, grey slacks or a skirt, a white blouse, and a red tie. From there students were taken to TCNJ for the competition. The Fashion Design competition was scheduled for 11:45 AM. The team arrived on time and changed into their garments. The MAST team was slated to go first and was only given a few minutes to prepare for the event. The emcee introduced the garments to the audience while the models displayed them. The presentation went over well. At the end of the day, the MAST team tied for first place.
At School:
On May 11th, I went to the oceanography class during period 7/8. It was a free class for them so I would not be interrupting any work. I showed them the garments and asked them to fill out a simple survey about them. The results tended to be positive with a few outliers.
Results:
Are the garments neat and professional looking? 4.78/5
How well do the outfits compliment each other? 4.78/5
How likely are you to purchase these products? 4.42/5


Conclusion:
Based on the results of both testing stages, I can say with certainty that the TSA Fashion Design project was a success. At the actual competition, MAST placed first among 4 other teams. If this wasn’t enough to judge the success of the project, I also took into account students opinions on the garment. The results of that test backed up the success of the project. All three areas received a score of 4.5 or greater with the exception of the third question. However, among the data there was an outlier which brought down the overall score.

Friday, May 1, 2009

Self and Design Evaluation

Scope of Project:
The TSA: Fashion Design project is a project tailored to reflect the participants’ skills in fashion, sewing, and design. Although teams could vary anywhere from 1-4 people, I chose to work solo on it. I felt that my own ideas about the designs would be hampered by the input of other team members, and in the end I would not be satisfied with the results. The competition, held on March 31st 2009, entailed designing and constructing three garments: a prom gown, suit jacket, and trousers. Competitors had to use original designs and not rely on premade patterns.
Description of Solution:
My final solution was a floral print gown featuring a corresponding taffeta sash. The design was inspired by the trends for the 2009 prom season which forecasted an increase in printed fabrics. The dress had a fitted bodice and a mermaid-style skirt featuring a flare at the bottom. The suit was a standard black Italian-style suit with a tapered waist and padded shoulders. It featured the same floral fabric used in the dress construction for the lining.
Discrepancies:
My final solution was a complete change from my original design. I had intended to construct a red gown with a full-length chiffon skirt, but after constructing it, I was unsatisfied with the results. The colors did not match the season; they were formal but fit better with a fall/winter atmosphere. When I was shopping for fabric in spring I found a vibrant floral print which inspired me to construct a new dress. Despite being finished with the red dress, and with it a large portion of my senior project, I took a chance with the new fabric. Using an entirely new design I constructed a dress that I was very happy with. Had I not done this I would have felt unsatisfied with my project. The suit design remained standard throughout my construction. Most suits feature the same set of pockets: two flap pockets, one welt pocket, and one hidden pocket in the lining. I kept the notched lapel and single-breasted front that I had originally designed. Having been inspired by Italian suits, I focused on a heavily tapered waist and heavy shoulder padding.
Successes and Failures:
My first problems with the project began when I had to sketch out my designs. I had trouble translating the ideas in my head onto paper. I knew from the past that I could construct garments from ideas in my head, but the extra step of drawing out my ideas complicated the matter. One of my biggest failures over the course of the project was getting the garments to fit properly. With the suit I overcame this problem by constructing a muslin. This was basically a rough draft of the final design which I could tailor to the model and use as a pattern for my final product. However, when I constructed the gown, I took a shortcut and worked directly with the fabric. This provided me with less than acceptable results. I forgot to leave room for seam allowances, etc. so when I finally finished the bodice of the dress and attempted to try it on, it was far too small. Instead of starting again I chose to alter and re-alter the bodice to fit, but each time I did this, the fabric became weaker and more frayed. Eventually I succeeded in getting the fit of the bodice correct, but instead of learning from this mistake, I again did the same thing with the skirt. At first I overestimated the size, but when I re-cut the fabric it was too small. In all I must have re-cut and re-sewn the skirt 4 times. My biggest success was definitely completing the garments. I was doubtful that I would finish on time, but I surprised myself. Admittedly, staying up for an entire weekend because I was falling behind on my schedule was not something to brag about, but I did finish, and the end product was good enough to win me first place at the competition.
Learning Opportunities:
As a result of mistakes:
I learned a lot from my failures within this project. The major thing I learned was not to take shortcuts. I definitely did more work than I had to because I was trying to take the easy way out. Another thing I learned was not to procrastinate. I set up a precise schedule for the construction of my garments and then I chose not to follow it. Instead of doing work slowly and consistently over the course of a few months, I worked vigorously for the first few weeks, getting a huge amount of work done, slacked off for a few weeks, and worked gruelingly at the 24th hour. This was not an uncommon pattern for me; I am generally inspired to work right away but lose interest rapidly. The only way I am re-inspired is by the fear of an impending deadline. I would not have felt so rushed if I had stayed with the schedule, and in the future I’ve learned that despite putting it off, I continuously contemplated the workload of the project.
Skills Developed:
Some of the skills I learned were directly related to my project alone. I feel that my skills in sewing increased significantly over the course of the year. What I might have considered a fundamental understanding developed into an increased ability of the process of sewing. I walked into the project with the experience of sewing only a few garments and the ability to hem, tailor to an extent, and repair garments. This project pushed my skills to the limits in all these areas. A suit is not an easy garment to make by any means. In fact, it can be considered one of the most difficult things to make. The price of suits proves this point. A high quality suit can run into thousands of dollars. Having no prior knowledge on any of the processes, I found myself researching so many things, whether it was how to make a flap pocket or how to make and install a lining. At one point I even disassembled one of my brother’s old suits to study it. I can say with conviction that my final product tested the limits of my capabilities, but because of that I gained profound insight. The list of skills I learned from making both the dress and suit seem limitless: making a muslin, installing interfacing, studying the grain of a fabric, setting in sleeves, tailoring a waist, gathering fabric, installing a lining, making pockets: flap, welt, and hidden, making a lapel, making a tie, hemming, the list goes on.


Design Flaws:
In the Gown:
Although I hate to admit it, design flaws are present in my final product. The gown I had originally constructed was too small around my waist. Because I chose not to construct new panels for a better fit, I ended up sewing and re-sewing the existing panels until the seam allowances were almost nonexistent and the fraying edges of the panels began showing through. Though it may not be so noticeable at first, the continued wearing of the garment would eventually cause enough stress to completely rip these seams. Also, the zipper on the back of the dress was not properly set in. It is slightly raised because I did not tailor it to my body exactly. I neglected this area because the sash which ties in the back does a great job of covering this flaw. One of the things I accidentally chose to neglect in the construction of my dress was the direction of the fabric. Though it seems like an unimportant detail, it greatly affects the overall composition of the garment. I used the straight edge of the fabric out of personal choice, but I should have instead used the bias of the fabric (45° angle from the warp and weft threads). A bias cut on fabric is recognized as the best cut because of its more fluid movement. Had my gown been made of pieces cut on the bias, I could have arguably achieved more fluid movement. I only learned about this after completing the gown, so if I had done more thorough research, I may have been able to implement this detail.
In the Suit:
The suit does not have as many flaws in its construction but a few are noteworthy. For example, the lining in the suit is fraying in one of the shoulders. I only noticed this after completely setting in the lining, so fixing it by machine was out of the question. Instead I hastily hand sewed it together to stop it from fraying any further. It looked sloppy and unprofessional, but it was all I could do the day before competition. The sleeves also have flaws. When sleeves are set in to a garment, the fabric has to be eased into an area which is smaller than the sleeve. Generally, seamstresses are able to do this without the fabric gathering or puckering at any point. However, since I had never set in sleeves before, I could not accurately install them. As a result, the fabric overlaps in a few places. The final flaw I noticed was along the bottom of the jacket. At the point where the lining meets the suiting, I failed to sew up a few of the corners. As a result, the front of the jacket has a few discrepancies. Because I know these garments so well from working on them, these flaws seem very apparent to me, but to an outsider, they are not as noticeable. Despite these flaws, I feel confident that my final product was a success.
Improvements in Problem Solving, Communication, and Organizational Skills:
This project helped me to improve many skills, including but not limited to problem solving, communicational, and organizational skills. Problem solving was a recurring theme throughout my project as I had to keep sewing and re-sewing the garments many times. If a portion didn’t lie right, I had to determine the problem and fix it. My communicational skills also improved when I was required to do drawings of the garments. I have in the past worked off of ideas in my head, but putting those ideas down on paper made the entire process much easier. My organizational skills also improved as I had to plan out each portion of my project on a calendar. Without developing these skills, I would not have finished my project on time.
Conclusion:
The TSA Fashion Design project was, to say the least, a learning experience. Not only did I have the chance to spend my senior year on something I am passionate about, but I also learned many useful skills along the way. Over the course of the project my sewing skills greatly increased, but on top of that, I learned to manage time well, work under pressure, and communicate my ideas to an audience. My public speaking skills even increased when we presented on our progress every marking period. Looking back on the project now, I am happy that I chose Systems Engineering II as my senior course.

Wednesday, April 8, 2009

Testing Results: TSA

The garments were entered into the regional TSA competition on March 31, 2009. There were 5 teams, and my garments placed 1st among them. I had intended to run a survey at school prior to the TSA competition, but I will now be doing that later, probably on May 1st. The survey will utilize the questions and scale I posted in my Testing Procedure section (see below) and the results will be posted here after I conduct the survey.

Testing Procedure


The garments are expected to be comfortable, attractive, and secure when sitting, standing, walking, and dancing. Based on the specifications, the outfits are completed within the school year. The final test is to actually bring the garments to a TSA competition, but since they do not judge every outfit, there is a chance that there would be no evaluation of my specific garments. Therefore, it is necessary to do tesing at school to provide a sufficient database of critique. The TSA competition is on March 31th. The gown and suit are expected to match and appeal to a broad audience, and the success of this will be judged using a survey handed out to observers. The outfits must also be comfortable when walking, sitting, standing, and dancing, scenarios that will apply at a prom. The success of this will be judged by surveying the models in comfort level and ease of movement.


Procedure for in-school test:


  1. Models are to try on outfits and provide feedback based on survey

  2. Models wear outfits to display either during class or during lunch, as there will be more feedback. Observers provide feedback based on survey


Testing for the TSA Fashion Design project involves participating in the TSA chapter competition on March 31, 2009. Entries will be submitted on this date for review by a panel.

TSA Competition Procedure:

  1. Entries are checked at a specific time and place TBA.

  2. Entries are reviewed by evaluators who will post a semifinalist list


  3. Semifinalists report to the event area at the time and place TBA


  4. Students will sign up for times to present their designs in a runway fashion show


  5. Presentation of designs: The designer acts as the emcee, describing the designs while the models walk the runway wearing the designed garments


  6. Time restraints: 10 minutes. 2 minutes for set up, 6 minutes for presentation, and 2 minutes for removal


  7. Final Evaluation takes place following presentation

Evaluation:
Portfolio (75 points)


  • Title, literature, synthesis, interpretation of theme, garment type and textiles to be used in design (10 points)


  • Design process sketches (30 points)


  • Computer printouts for final designs (30 points)


  • References (5 points)

On-site presentation (25 points)


  • Quality of Garments (15 points)


  • Presentation quality (5 points)


  • Organization adn depiction of theme (5 points)

Rules Violation (-20% total points)

Wednesday, March 25, 2009

Original Dress Design

Original Final Solution


Original Dress (Front)


Original Dress (Back)

New Dress Design


My new dress' eccentric design is aimed to appeal to the tastes of the judges for the TSA Competition. It's an atypical version of prom attire. Pictured above is the dress before it was hemmed.


Wednesday, March 4, 2009

Procedure for Making Suit


1. Cut out front pieces for suit and secure interfacing
- Cut interfacing to appropriate size
- Attach to wrong side of fabric using steam setting on iron
2. Construct front flap pockets using piping and pocket/liner
- Add interfacing to piping, sew to outer side of suit
- Slash pockets and cut diagonally to last stitch
- Turn piping inwards and baste. Steam
- Attach liner piece to pocket along outside seam. Steam downwards
- Attach pocket piece and flap to pocket along outside seam. Steam and sew together pocket
3. Vent pocket is made in similar manner but omits the flap. Instead the vent is attached to the outside
4. Sew together back pieces and install interfacing along the back flap. Steam into shape
5. Attach front pieces to back pieces along shoulder seam and side seam
6. Create the lapel:
- Cut out pieces for lapel and add interfacing. Attach underside to collar of jacket and upper collar to lapel pieces. Sew together, invert, and press.
7. Cut out and sew together sleeves. Add interfacing to slits at end of sleeves.
8. Carefully attach the sleeves to the jacket making sure that the fabric doesn’t gather.
9. Create a liner using same patterns for front of jacket and back of jacket. Sew along collar line down to front. Check fitting on model before hemming sleeves and bottom.

Trousers
1. Cut out back trouser pieces and create a pocket like the one described for the jacket, omitting the flap.
2. Cut out front of trousers and install front pockets
Sew trouser fronts to back along inner and outer seams. Turn one leg right side out and fit it into the other, right sides facing. Sew seams together
Install zipper and button
3. Cut out waistband piece and install waistband interfacing. Fold over trousers, right sides facing and sew together. Fold upwards and steam
4. Fold top pieces together and sew. Steam
5. Check for fitting

Pictures of Construction

Interfacing within the jacket lapel.

Installing and shaping the lapel.

Setting in the sleeves.

Monday, January 5, 2009

Procedure for Making Tie

  1. Cut pieces of reinforcement on the bias to the necessary size using pattern. Two pieces will be needed, and can be sewn together. The seam should be pressed open and trimmed down

  2. Cut 4 pieces of silk satin from pattern. Assemble as illustrated:


  3. Carefully fold and steam silk-satin around reinforcement. Pin down pieces


  4. Finish off with a hand stitch going up the back to hold flaps closed. Steam.


Pieces for the tie have been cut, sewn together, and pressed. You can see the crease along the top where the red silk-satin will overlap the reinforcer. After the tie has been ironed as such, the two pieces in the back should be hand stitched in place. The bottom piece has already been hand sewn in place. The top piece should utilize a double blindstitch (see below)

Singer Reference Library

Procedure for Making Dress

A second gown is currently under construction of the project. The procedure will be posted at a later date


Gown Bodice:


    7 pieces of liner cut out to basic shape. Sides are mirrored with one large piece in the front and 3 on each side. Pieces may need to be altered based on form of model.


  1. Cut out the 7 basic pieces of the bodice from the liner material. One piece for the center and 3 on each side. Leave ½ inch seam allowances for alterations.


  2. Pin liner pieces together and run a basting stitch along the sewing lines.


  3. Check for fitting and make any alterations. Sew the seams


  4. Liner pieces have been sewn together and fitted. Boning tubes have been sewn into place and boning is inserted.


  5. Remove boning from tubing. Stitch tubing along liner seams on the wrong side of the fabric. 6 pieces in all should be used


  6. Close up view of a dress bone. Bones are positioned along seam and sewn on either side. Be careful not to interfere with channel.


  7. Insert boning and check again for fitting. The wrong side of the fabric should be on the outside. Sew off ends of tubing.


  8. Using the pieces from the liner as a basis, determine the size of the pieces to be cut from the silk satin material. Leave ½” seam allowances


  9. Pin and baste together the pieces of silk satin, right sides together.


  10. Check for fitting and sew the seams.


  11. Back of dress: Lining and outer layer are lined up along the seams and hand basted in line. A machine stitch is run along the top of the dress.


  12. Line up liner and outer silk satin layer right sides together. Pin together and check for alignment. Add support cups to liner and hand sew in place.


  13. Run a basting stitch along the top of the liner and satin and check for fitting.


  14. Construct 12 pipes for loops in back


  15. Loops: Cut a 1” bias strip from the length of silk satin. On right side, sew a thin cord at the top of the strip Fold fabric over cord and run a stitch along the length of the fabric making a 3/8” tube. Make sure to keep the cord inside At the end of the strip, cut away from sewing machine and cut off excess fabric to roughly 1/8” Gently pull cord to turn strip inside out Cut strip into 2 ½ inch sections


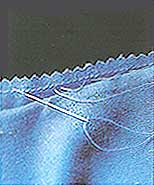
  16. Wrong sides of fabric are facing out. In between, loops are positioned to be one inch wide and 1/8" apart. Loops are pinned in place and a machine stitch is run along them 1/2" in from rough edge.


  17. Line up ties along the back edge of the garment between the two right sides at about 1” each. Fold each over to make a loop


  18. Sew loops into place


  19. Back view of dress with contrasting tie. Loops are tested to see how they pull the fabric. Bottom portion of bodice will have zipper inserted.


  20. Turn garment right side out and check for fitting


  21. Construct a 2 yard tie for the loops


  22. Tie: Cut 1” bias strips from the length of silk satin. Line up each end and pin together. On right side, sew a thin cord at the top of the strip Fold fabric over cord and run a stitch along the length of the fabric making a 3/8” tube. Make sure to keep cord inside At the end of the strips, cut away from a sewing machine and cut off excess fabric to roughly 1/8” Gently pull cord to turn strip inside out Sew off ends


  23. Weave tie into loops in back and check for fitting.


  24. Finish off any seams, cut off extra string


Comparing Fabrics for the skirt. Top material is silk-satin, bottom is chiffon


Gown Skirt:


  1. Begin with sewing the liner. Cut shape from pattern sheet. Pin every necessary dart and sew onto inner liner of bodice. The seam should be at the back of the dress.


  2. Leaving about 4” at the top for a zipper, sew the two ends of the skirt liner together. Check for fitting.


  3. Cut the chiffon into 2 5 yard pieces. Utilize gathering to gather the length down to 34". Hand-baste a seam along the top edge of each and pull to gather.


  4. Attach to outer layer of bodice with a basting stitch individually. Machine-sew all together.


  5. Install the zipper:


  6. Zipper: Start with the inner layer of the bodice and baste zipper onto fabric. Continue down into skirt as necessary. Stitch on both sides. If fitting is correct, machine sew into place. Secure the outer layer with pin-stitching. Zipper should not attach to chiffon layers.


  7. Check for fitting and length and alter length if necessary. Use a piping seam along the edge to finish off.


Bill of Materials

Below is a comprehensive list of the required materials thus far as well as an estimate of the materials needed for future work.